The Relationships page allows the system administrator to create join relationships for data objects in the Ad Hoc instance. Join relations must be defined within the instance because relationships that exist in the source database are not synchronized by the Schema Wizard. Join relationships created in the Relationships page are stored in the Ad Hoc metadata database; the reporting database is not modified.
Relationships impact the end user when they are selecting data objects in the Report Builder to be included in the report. When they select the first data object, the list of data objects is adjusted to show the selected data object and any related data objects. Every time a data object is selected, the list of related data objects is refreshed.
|
Hint: |
|
Administrators running Microsoft SQL Server, Oracle, Informix or Sybase as a reporting database can utilize the Import Relationships action in the Management Console to synchronize the instance with join relations from the reporting database. Refer to the Management Console Usage Guide for more details. |
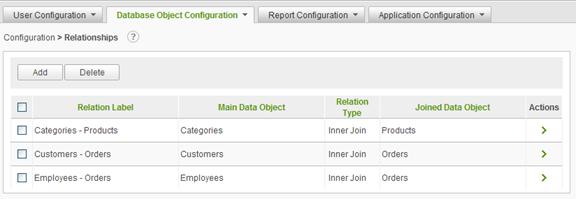
Select Relationships from the Database Object Configuration drop-down list to display the Relationships configuration page.
A list of relationships is displayed allowing the system administrator to view information associated with each relationship, such as the type of relation and which objects are joined together.
|
Note: |
|
Main Data Object refers to the left data object and Joined Data Object refers to the right data object. |
Click on the
![]() icon
to display brief help for the Relationships page.
icon
to display brief help for the Relationships page.
The Add button will display an empty Relationship page.
The Delete button will remove the selected relationships. Relationships are selected by clicking on the applicable checkbox.
|
Note: |
|
Removing relationships marks any reports that depend on that relationship as broken. Delete relationships with caution. Use the View Dependencies option to determine the scope and usage of a relationship. |
The rows in the relationship grid may be sorted by clicking on the Relation Label, Main Data Object, Relation Type, or Joined Data Object column header.
The ![]() icon
indicates that more than one action can be performed on the data object. Hover
the mouse over the
icon
indicates that more than one action can be performed on the data object. Hover
the mouse over the ![]() icon to display the available
actions and click on the appropriate one.
icon to display the available
actions and click on the appropriate one.
The available actions for a relationship are Modify Relationship and View Dependencies.
The following join types are available in the application:
|
Hint: |
|
Normally, only one relationship needs to be defined between two data objects. Although three relationship types are allowed, avoid creating more than one. In the event that more than one relationship type is created between the same two data object, attempt to make the relationship's label descriptive. |
Adding a new Relationship
To create a new relationship between two data objects, click on the Add button. A blank Relationship page will be displayed.

Click on the
![]() icon
to display brief help for the Relationship page.
icon
to display brief help for the Relationship page.
The specified Relation Label should clearly identify the data objects and relationship type; however that is a recommendation and not a requirement.
The Main Data Object and the Joined Data Object identify the two data objects that are related. Select a data object from each of the respective lists.
Select the Join Type from the provided list.
The Auto Reverse checkbox indicates whether the relationship is literal or logical . Ad Hoc has the ability to logically relate the two data objects. If a relationship is defined, the logical reverse of the relationship can be assumed by enabling the checkbox.
If the Auto Reverse checkbox is unchecked, the relationship is literal . When the user selects the Main Data Object for their report the related Joined Data Object will be shown; however, if the Joined Data Object is selected for their report, the related Main Data Object is not shown. The relationship only exists in one direction.
The Joined Data Object Modified Label and the Main Data Object Modified Label are displayed in the Report Builder to help identify the data objects to the end user. Enter a nickname for the data objects to be presented when the data object available for selection in the Report Builder.
Relationships are also between columns in the data objects. Normally relationships are based on a single pair of columns in the two data objects; however, compound relationships based on multiple column pairs can be created.
Select the columns to be related from the drop-down lists for the Main and Joined Data objects. For compound relationships, click on the Add button and select the second pair of related columns. To remove column pairs, select the pair of columns with the checkbox and click the Delete button that becomes visible with more than one pair of related columns.
Click on the Save button to store the relationship in the metadata database.
|
Notes: |
|
If the Main Data Object drop-down menu is inactive, relationships can only be created from that specific object to another object. |
To modify a
relationship, hover the mouse over the ![]() icon to display the available
actions and click on the Modify Relationship action.
icon to display the available
actions and click on the Modify Relationship action.
The Relationship page will be displayed.
Modifications to either the data objects or related columns will break the reports that rely on them. It is strongly suggested that the View Dependencies report is run to identify the scope and impact of potential relationship changes.
Modifications to the Auto Reverse flag may break reports.
Modifications to any of the labels will not impact the reports.
Make the necessary adjustments to the relationship and click on the Save button to store the relationship in the metadata database.
View Dependencies
To view the
dependencies for a relationship from the Relationships page, hover the
mouse over the ![]() icon to display the available
actions and click on the View Dependencies option.
icon to display the available
actions and click on the View Dependencies option.
The option to
view dependencies of a relationship may help System Administrators know the
scope and impact of changes to a relationship.