Users can create and store reports in the root folder or within
an existing folder to store reports. Administrators can create folders in the
Shared Reports area, which can be accessed by all users or limited to users
based on the role(s) assigned to the user.
To create a new folder to store reports:
- Navigate to a report area (e.g., Personal Reports, Shared
Reports) or folder in which the new folder is to be created.
- Hover the mouse over the Add button and select Folder
from the list.

- Type the name of the new folder into the Folder field
- OPTIONAL: Type a description into the Description
textbox.
- OPTIONAL: As a designated administrator of a User
Group and from the Shared Reports area, specify restricted access to this
folder based on a user's role. By default, all roles have access to the
folder. To limit access:
- Select the Specific Roles option.
- Move roles between the Available Roles and the Roles
With Access list-boxes by double-clicking on the listed role or by
selecting the role and then clicking the
 (right) or
  (left)
icon. At a minimum, the roles currently assigned to the user creating the
folder must have access.
(left)
icon. At a minimum, the roles currently assigned to the user creating the
folder must have access.
- Click Save to create the new folder.
To modify a report folder:
- Click the
 icon to modify the
corresponding report folder.
icon to modify the
corresponding report folder.
- As desired, modify the folder name and description in the
provided fields.
- OPTIONAL: As a designated administrator of a User
Group and from the Shared Reports area, specify restricted access to this
folder based on a user's role. By default, all roles have access to the
folder. To limit access:
- Select the Specific Roles option.
- Move roles between the Available Roles and the Roles
With Access list-boxes by double-clicking on the listed role or by
selecting the role and then clicking the (right) or (left)
icon. At a minimum, the roles currently assigned to the user creating the
folder must have access.
- Click Save to commit the changes.
Changes are reflected in the Name column and the Last
Modified column is updated to the current timestamp.
To delete one or more report folders:
- Select the desired folder(s) by enabling its respective
checkbox(es).
- Click the Delete button.
- Click OK to confirm the removal.
|
Note:
|
|
Deleting a report folder removes all reports stored within
that folder. A backup copy of deleted reports is stored in the ..\_Definitions\_Reports\_Backup
directory before they are removed from the application. Imported reports will
be deleted from being visible in the application interface but will not be
deleted from the _Reports directory.
|
After creating a new report folder, move reports out of the
root folder to make the workspace more manageable.
To move reports into a folder:
- To move a single report, hover the mouse over the
 icon
and select Move from the list of actions or select the report with
the checkbox adjacent to the report name and click on the Move
button. Multiple reports may be moved by selecting the reports and
clicking on the Move button.
icon
and select Move from the list of actions or select the report with
the checkbox adjacent to the report name and click on the Move
button. Multiple reports may be moved by selecting the reports and
clicking on the Move button.
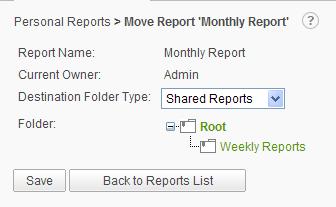
- OPTIONAL: From the Organization
drop-down menu, select a user group. Organizations are not available by
default. The administrator must have specifically enabled the Organization
capability and created multiple organizations.
- From the Destination Folder Type drop-down
menu, select a folder type.
- OPTIONAL: From the Folder tree, locate and
select a folder to store the report in.
- Click Save to move the report.