Menu Bar
There are six main links available in Ad Hoc in the menu bar at the top of the page:
IMPORTANT: Unless specifically stated otherwise, use of the word 'report' or 'reports' in the description of the Ad Hoc's functionality implies both reports and dashboards.
![]()
If more than one reporting database is available for the end user, the menu bar will also present a dropdown list to allow the user to select the database.
![]()
The Report Builder and Dashboard Builder use the currently selected database as the source for all report data. Consequently, if the currently selected database is changed, any reports that contain data from another database are not visible.
|
Note: |
|
If the Database drop-down menu is not visible, then the user only has access to one database. Contact the system administrator if additional access is needed. |
Reports Page
The Reports page is the default main page in Ad Hoc. For end users, reports are divided into Personal Reports and Shared Reports. The Personal Reports tab will display a list of reports, dashboards and folders specific to the logged in user. The Shared Reports tab will similarly display a list of the shared by all users.
Initially, the Reports page will not have any reports, dashboards, or folders to list or manage and the page will appear as:
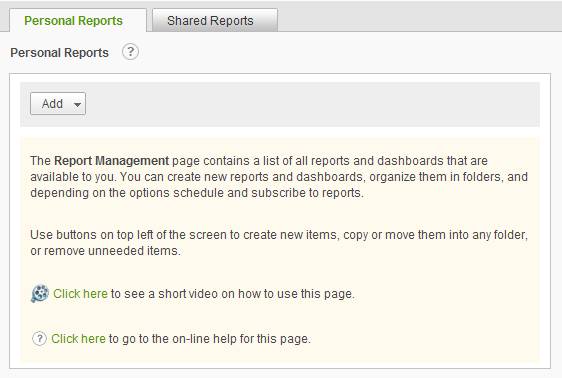
On the page are a Personal Reports breadcrumb link to
this page, the ![]() icon to display brief help for the
page, and the Add button to create reports, dashboards and folders.
icon to display brief help for the
page, and the Add button to create reports, dashboards and folders.
Once reports, dashboards or folders are added to the application, the Reports page will appear as:
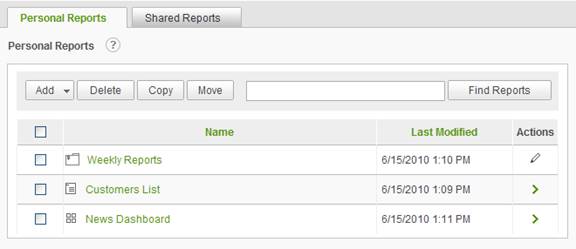
In the above example is a folder named Weekly Reports , a report named Customers List , and a dashboard named News Dashboard.
Following are the available functions:
Add hover over the Add button to display the dropdown list to create a report, dashboard or folder
Delete click on the Delete button to remove selected items from the list
Copy click on the Copy button to replicate the selected items
Move click on the Move button to move the selected items to another location
Find Reports click on the Find Reports
button to do a contains search of the Name column for the associated
text. Click on the ![]() icon in the textbox to clear the
text and refresh the list. This option is configurable and may be hidden.
icon in the textbox to clear the
text and refresh the list. This option is configurable and may be hidden.
|
Notes: |
|
1. The Find Reports criteria will be retained for all subsequent visits to the page until it has been cleared out. 2. Depending on a user's Preference settings, the Find Reports criteria may be retained after logging out or terminating a browser session. |
Select All click on the checkbox in the list header to select or deselect all items in the list
Sort sort the list by clicking on the Name or Last Modified header. Clicking a second time will reverse the sort order.
Select Items click on the checkbox within a row to select or deselect the item in the list
Run Reports and Dashboards click on the report or dashboard link in the list to execute the item
Folder click on the folder link in the list to navigate to a folder
![]() - this action icon indicates that
only a single action can be performed on the item. Click on the icon to perform
the action. Typically the single action is Modify.
- this action icon indicates that
only a single action can be performed on the item. Click on the icon to perform
the action. Typically the single action is Modify.
![]() - this action icon indicates that
there are multiple actions that may be performed on the item. Hover the mouse
over the icon to display the dropdown list of actions available. The available
actions are dependent upon the configuration and the item type; however, the
list may include Modify, Rename, Copy, Move, Schedule, Archive and View
Dependencies.
- this action icon indicates that
there are multiple actions that may be performed on the item. Hover the mouse
over the icon to display the dropdown list of actions available. The available
actions are dependent upon the configuration and the item type; however, the
list may include Modify, Rename, Copy, Move, Schedule, Archive and View
Dependencies.
The following icons are used to signify a report's status or type:
|
|
|
|
|
|
|
|
|
|
|
|
|
|
|
|
* Web Studio is not available
in the Java version.