Data Objects are core to the Ad Hoc reporting architecture. A data object is simply a collection of related columns whose definition resides in the metadata database.
Most data objects are created by importing all or part of a schema from a reporting database using the Management Console. The database table and view definitions are ported into the Ad Hoc metadata database.
Data objects may also be created by defining virtual views and catalogs within the Ad Hoc interface. A virtual view is a SQL SELECT statement that identifies the columns, tables, relationships and data transformations necessary for reporting. A catalog is a pre-defined set of related data objects and columns. Virtual views and catalogs only exist in the metadata database.
The concept of Data Object definitions existing in the metadata database is what allows the System Administrator to customize the end user experience and reduce the database specific technical knowledge required to produce complex reports. User friendly names, pre-defined relationships, user-defined columns and data object level filters are all designed to benefit the end user.
The Data Objects page allows the system administrator to customize data objects in the application. An objects label, column-formatting options, column descriptions, access rights, fixed parameters, user-defined columns and relationships may be modified.
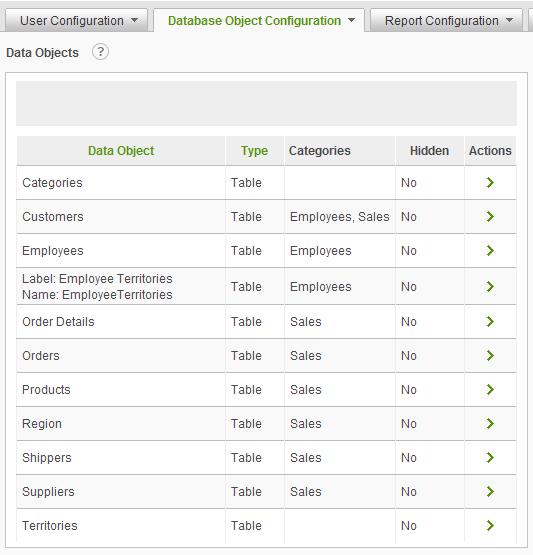
Select Data Objects from the Database Object Configuration drop-down list to display the Data Objects configuration page.
Click on the
![]() icon
to display brief help for the Data Objects page.
icon
to display brief help for the Data Objects page.
Information on the page may be sorted by clicking on the Data Object or Type column headings.
The ![]() icon
indicates that more than one action can be performed on the data object. Hover
the mouse over the
icon
indicates that more than one action can be performed on the data object. Hover
the mouse over the ![]() icon to display the available
actions and click on the appropriate one.
icon to display the available
actions and click on the appropriate one.
The available actions for a data object are:
Modify Data Object to change data object friendly name, description and visibility to the end user, as well as the column display order, friendly name, description, default format, default alignment, and hidden status as well as view the dependencies for each column or the data object. User-defined columns may also be defined.
Set Relations to define relationships between the selected data object and other data objects and view the relationship dependencies.
Set Data Object Access Rights to modify the data object access rights for each defined role.
Set Parameters to specify and manage one or more "fixed parameters" for the data object. Fixed parameters are filters applied to the data object in every occurrence of the data object's use.
Set Links to configure links from columns to a URL or report.
View Dependencies - The Dependencies page presents information about the content or usage of an item. The information is very helpful for System Administrators that need to know usage information.
The Modify Data Object page provides allows the System Administrator to:
Hover the
mouse over the ![]() icon to display the available
actions and click on the Modify Data Object option. The following page
will be presented:
icon to display the available
actions and click on the Modify Data Object option. The following page
will be presented:
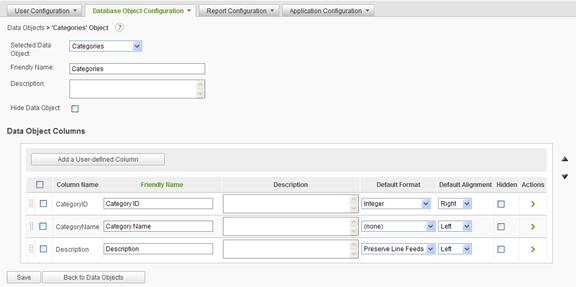
The Friendly Name of the data object and the Description are presented in the Report Builder when the user is selecting the data for a report.
The Hide Data Object checkbox determines whether the data object is visible when the user is selecting data for a report. The system administrator may avail themselves of other mechanisms to provide this data, such as Catalogs or Virtual Views and may not want users accessing the data object directly.
The Friendly Name and Description of a column is presented in the Report Builder when the user is selecting data for the report. The Default Format and the Default Alignment drop-down lists set the initial format and alignment, respectively, for a column in the Report Builder. The Hidden checkbox determines whether the column is visible through the Report Builder selection process.
Columns are presented to the end user in the Report Builder in the same order displayed in the Modify Data Objects page. The columns may be presented alphabetically by Friendly Name by clicking on the Friendly Name column header. They may also be rearranged by using the drag-and-drop capability.
|
Note: |
|
Drag-and-drop
capability exists throughout the Ad Hoc interface. Mousedown on the handle ( |
Click on the Save button to store the changes.
|
Notes: |
|
1. Choose appropriate values for Default Format to avoid undesirable results when generating reports. 2. If HTML is selected as the Default Format, then an end-user will not be able to change the format of the column in the Report Builder to something else. 3. The 'Preserve line feed' format allows text in a memo type field to display as it is stored with line feeds (a.k.a., carriage returns) observed. This is the default format for data types of Long Text (e.g., LongVarWChar). |
The System Administrator can extend the list of columns for a data object by creating user-defined columns. The definition of a user-defined column must conform to the SQL SELECT syntax of the reporting DBMS for a column. Typical uses of user-defined columns include string formatting and concatenation, CASE statements and in-row calculations.
To create a user-defined column, click on the Add a User-defined Column button. The following dialog will be displayed:
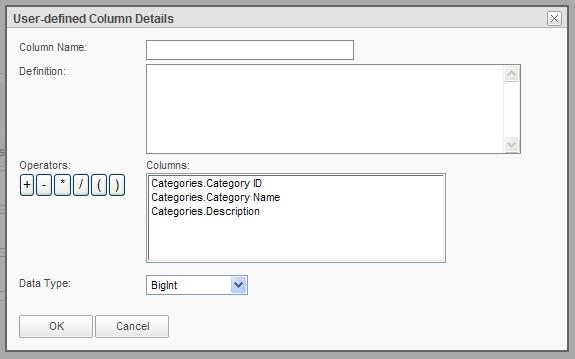
Enter a unique Column Name and the Definition in the space provided.
|
Note: |
|
A user-defined column's Definition must be a valid SQL statement. If design-time validation is ON, this statement will be validated against the database to assure it is syntactically correct. |
If the calculated column is based on an existing column, use the Columns list to select the existing column and place it in the Definition.
Clicking on one of the Operators will place the operator into the Definition at the last cursor position.
Select the Data Type of the expected result of the Definition.
Click on the OK button to validate the Definition and store the result.
Once a user-defined
column has been created, it may be changed or removed by hovering the mouse
over the ![]() icon for the user-defined column
to display the available actions and click on either the Modify Column
or Remove Column option.
icon for the user-defined column
to display the available actions and click on either the Modify Column
or Remove Column option.
|
Note: |
|
The Modify Column or Remove Column actions are not an option for the original columns of the data object. |
Click on the Save button of the Modify Data Objects page to commit the user-defined column definition to the metadata database.
View Dependencies
To view the dependencies
for a column from the Modify Data Objects page, hover the mouse over the ![]() icon to
display the available actions and click on the View Dependencies option.
The following page will be presented:
icon to
display the available actions and click on the View Dependencies option.
The following page will be presented:
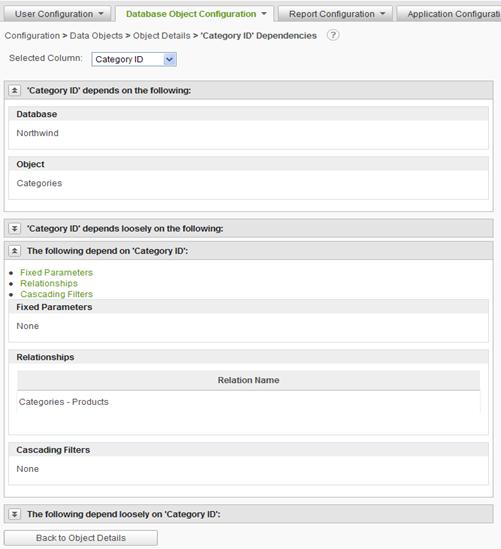
The content
of this page has been adjusted to fit on the page. The View Dependencies option
for a column presents a report of where the column is used throughout the Ad
Hoc instance. This report can help System Administrators determine the
potential scope and impact of changes to a column definition.
The System Administrator may define relationships between data objects. When a relationship exists between two data objects, selection of one of the data objects will present the end user with the opportunity to select the related data object in the Report Builder.
|
Note: |
|
Refer to the Relationships section of this guide for detailed information about creating and managing relationships. |
To define
relationships for a data object from the Data Objects page, hover the mouse
over the ![]() icon to display the available
actions and click on the Set Relations option. The following page will
be presented:
icon to display the available
actions and click on the Set Relations option. The following page will
be presented:
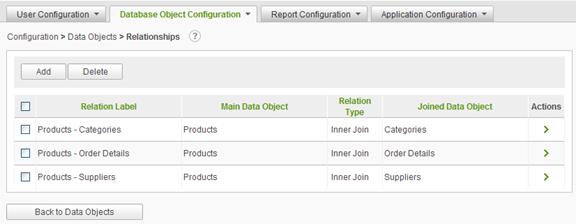
A list of relationships from the current data object to other data objects in the database is displayed.
Click the Add button to create a relationship from the current object to another data object in the database.
Data Object Access Rights may be set for the data object or specific columns in the data object for each defined Role. Data Object Access Rights determine which data objects and columns are restricted from use by a Role. By default, all data objects and columns are accessible by all roles.
|
For detailed help setting access rights, refer to the Setting Data Object Access Rights in the Roles section of this guide. |
To set the
access rights for a data object from the Data Objects page, hover the mouse
over the ![]() icon to display the available
actions and click on the Set Data Object Access Rights option. The
following page will be presented:
icon to display the available
actions and click on the Set Data Object Access Rights option. The
following page will be presented:
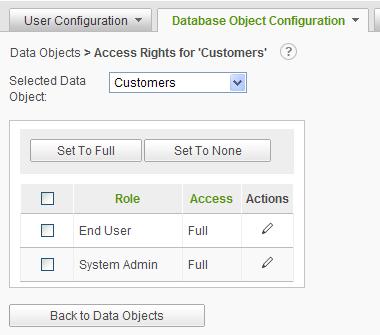
Access rights for the Selected Data Object may be set to full or none for a role by selecting the role with the checkboxes and clicking on the Set to Full or Set to None buttons, respectively.
Alternatively,
click on the ![]() icon to Modify Column Access
Rights to display the Column Access Rights dialog and set the access
at the column level.
icon to Modify Column Access
Rights to display the Column Access Rights dialog and set the access
at the column level.
Permanent filters may be applied to a data object. These filters are called fixed parameters and are transparent to the end user. Additional parameters may be applied as the report is built and executed, but the end user cannot modify the fixed parameter on the data object.
To define and
manage fixed parameters for a data object, hover the mouse over the ![]() icon to
display the available actions and click on the Set Parameters option.
The following page will be presented:
icon to
display the available actions and click on the Set Parameters option.
The following page will be presented:
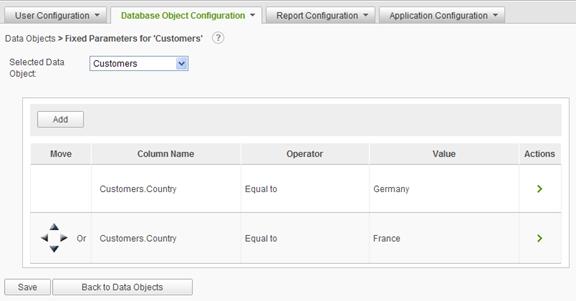
A fixed parameter takes the form of an equation similar to:
|
Notes: |
|
1. These operators are only available for data type of type String or Text. 2. The operators available are dependent upon the column's data type. For example, a numeric data type would not include operators such as true/false. |
Managing Fixed Parameters
Click on the Add button to define a fixed parameter. The following dialog will be presented:
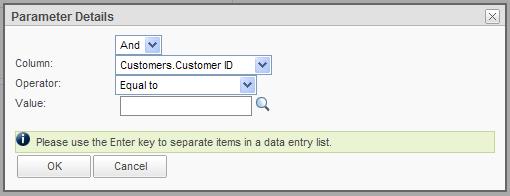
If fixed parameters have been previously defined, the option to specify an And/Or condition will be presented.
Select the Column from the drop-down list, an Operator from the drop-down list and either provide a Value manually or use the magnifying glass to select a Value from the reporting database.
Click on the OK button to store the fixed parameter information temporarily.
After adding all of the fixed parameters, click on the Save button on the Parameters page to store the information in the metadata database.
To edit or
remove a fixed parameter, hover the mouse over the ![]() icon to display the
available actions and click on the Edit Parameter or Remove Parameter
option, respectively.
icon to display the
available actions and click on the Edit Parameter or Remove Parameter
option, respectively.
|
Notes: |
|
1. If the In list or Not in list operator is selected, then more than one value may be specified. If manually typing in each value, then follow each entry by the ENTER key. 2. If the value is a number, the Value field must contain a valid number to build the report. 3. The Parameter functionality does not support conditions against data types of type Time. Date/Time data types are supported but their time portion will be ignored. |
|
Hint: |
|
When adding multiple parameters, a logical operator (And or Or) becomes available for selection at the beginning of the next parameter. Use this operator to set the cumulative conditions for the parameters. |
If the report
contains two or more parameters, the ![]() icon appears for each additional
parameter. The directional pad gives users the ability to create levels for
each parameter. Control the order of evaluation for multiple parameters using
the directional pad.
icon appears for each additional
parameter. The directional pad gives users the ability to create levels for
each parameter. Control the order of evaluation for multiple parameters using
the directional pad.
Advanced data filtering makes it possible to define groups of parameters that work together to filter undesirable data. Multiple parameters can be defined to control the order of evaluation. Filter data to control what users see at runtime.
Fixed
parameters on data objects give administrators the ability to control the
content seen by end-users. Filter extraneous data by defining one or more
parameters that are evaluated at runtime. The directional pad control (![]() )
enables administrators the ability to control the order of evaluation.
)
enables administrators the ability to control the order of evaluation.
The individual arrows of the control perform the following functions:
![]() Shifts
a parameter one position higher in the list (retains indentation)
Shifts
a parameter one position higher in the list (retains indentation)
![]() Shifts
a parameter one position lower in the list (retains indentation)
Shifts
a parameter one position lower in the list (retains indentation)
![]() Indents
a parameter one position left
Indents
a parameter one position left
![]() Indents
a parameter one position right
Indents
a parameter one position right
|
Note: |
|
Parameters indented furthest to the right are evaluated first. |
Using Session Parameters
If session parameters have been defined for the Ad Hoc instance, the fixed parameters detail dialog may be slightly different. See the following picture:
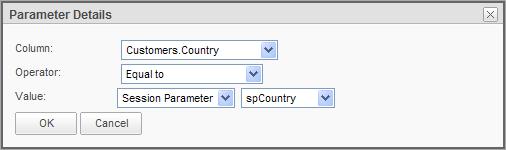
Notice that there is a Value source dropdown. This dropdown is shown when there may be session parameters used as part of the filter. The source is typically a Specific Value ; however, if session parameters have been defined, Session Parameter may be selected as the Value source. When Session Parameter is selected, a dropdown list of relevant session parameters is displayed.
Session parameters are one of five types; date, number, numeric list, text or textual list. The dropdown list of session parameters will contain the session parameters that match the data type of the Column. The list is also restricted by the Operator selected.
For date Columns, the date session parameters will be shown in the list of available session parameters.
For numeric Columns, either the number or numeric list session parameters will be shown in the list of available session parameters. If the Operator is set to In List or Not In List , the numeric list session parameters will be shown, otherwise the number session parameters will be shown.
For text Columns, either the text or textual list session parameters will be shown in the list of available session parameters. If the Operator is set to In List or Not In List , the textual list session parameters will be shown, otherwise the text session parameters will be shown.
In older versions of AgileReports , session parameters could also be used as the basis for a fixed parameter on a data object as shown in the following picture:
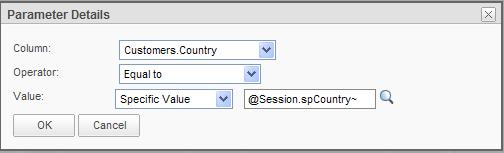
Notice that the Value source is Specific Value and that an @Session token has been supplied as the Value. While this technique is still supported in AgileReports, @Session tokens require a specific syntax and the session parameter specified must match the session parameter name exactly, including case. There is no type checking of the value and the SQL syntax generated may not be appropriate in all cases.
The preferred
method for using session parameters as the basis for a fixed parameter on a
data object is to select Session Parameter as the Value source and
selecting the appropriate session parameter from the available list.
System administrators can create automatic hyperlinks for each record in a specified column. End users can access these links to open other web pages or drill through to different reports. End users also have the option of enabling or disabling the links when building reports.
To define and
manage links from a data object, hover the mouse over the ![]() icon to display
the available actions and click on the Set Links option. The following
page will be presented:
icon to display
the available actions and click on the Set Links option. The following
page will be presented:
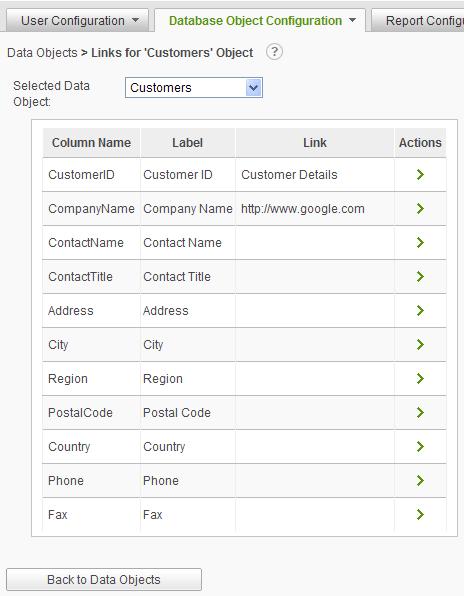
The list contains the columns that are candidates for linking to either a linked report or a URL.
|
Note: |
|
A column may only have one link defined. |
From the list
of columns for the data objects, hover the mouse over the ![]() icon to display
the available actions. The available actions will either be Add Link or Edit
Link and Remove Link. The following dialog will be displayed:
icon to display
the available actions. The available actions will either be Add Link or Edit
Link and Remove Link. The following dialog will be displayed:
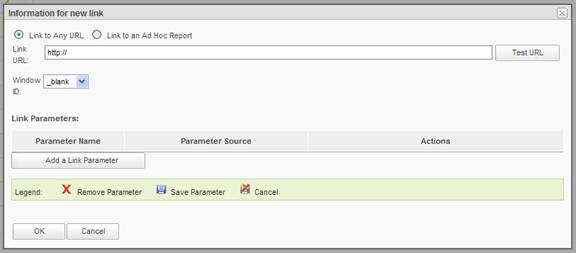
Administrators must first determine if the link points to an Ad Hoc report or an external URL.
To create an object link to a URL, the Link to Any URL option must be selected.
Enter the Link URL information and click on the Test URL button to verify the address.
Click on the Add a Link Parameter button and type in the parameter name. Choose the column that will be the source of the data for the parameter from the drop-down menu.
Click on the OK button to save the information.
To create a
link to an existing Ad Hoc report, select the Link to an Ad Hoc Report
option and the dialog will be re-displayed as follows (image shows the effect
of clicking on the ![]() icon):
icon):
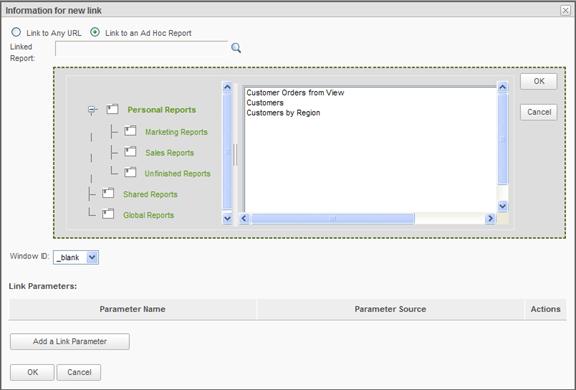
Click the ![]() icon to
locate and choose a report from the list. After selecting the report, click OK.
icon to
locate and choose a report from the list. After selecting the report, click OK.
Click on the Add
a Link Parameter button and click on the ![]() icon to select the target parameter.
Choose the column that will be the source of the data for the parameter from
the drop-down menu.
icon to select the target parameter.
Choose the column that will be the source of the data for the parameter from
the drop-down menu.
Click on the OK button to save the information.
|
Note: |
|
Linked reports must have at least one parameter to enable drill-through functionality between two reports where the content of the linked report is dependent upon data from the parent report. Links to a static report do not require link parameters. Refer to the Linking Reports section of this guide for more information about linked reports. |
View Dependencies
To view the
dependencies for a data object from the Data Objects page, hover the
mouse over the ![]() icon to display the available
actions and click on the View Dependencies option. The following page will
be presented (a split view is presented here:
icon to display the available
actions and click on the View Dependencies option. The following page will
be presented (a split view is presented here:
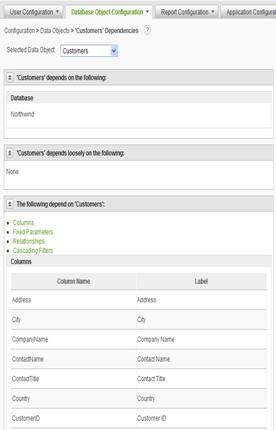
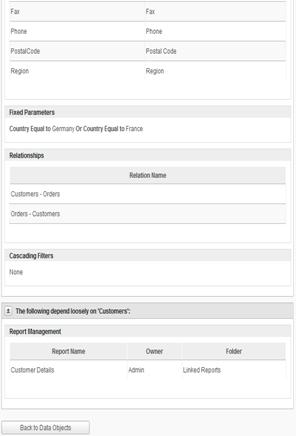
The option to
view dependencies of a data object may help System Administrators know the
scope and impact of changes to a data object.