Add New Event Service Screen > Scheduled Service Screen

Starts a process based on a specified schedule.


Good to Know

How to Start

  1. In the Manage Center, click System > Events Service.
  2. On the Events Service Screen, click Add Event Service
  3. On the Add New Event Service Screen > Select Type of Event Service, select Scheduled Service.
  4. Click Next.
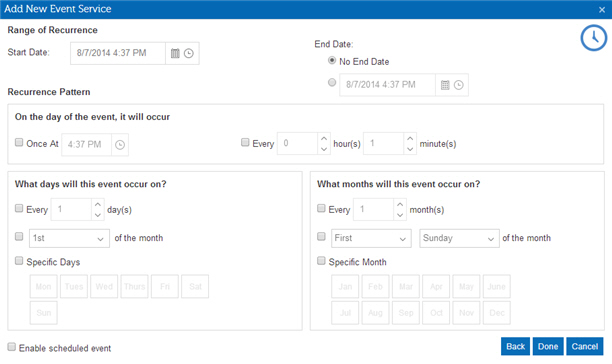
  5. On the Add New Event Service Screen, complete the fields ​as necessary.
  6. Click Next.

Fields

Field Name Definition

Start Date

Function:
Specifies the date and time that the event starts.
Accepted Values:
A valid date and time format.
Default Value:
None

No End Date / End Date

Function:
Specifies the date and time that the event stops.
Accepted Values:
  • No End Date - Specifies the event does not have a date to stop.
  • End Date - Specifies the date and time the event stops.
Default Value:
No End Date

Once At / Every

Opens this Screen:
Specifies if the event occurs at a set time or at a set number of hours or minutes.
Accepted Values:
  • Once At - Event occurs at a specified time.
  • Every - Event occurs at a set number of hours or minutes.
Default Value:
None

What days will this event occur on?

Function:
Specifies that on what days this event occurs.
Accepted Values:
  • Every Day - Event occurs on every specified day.
  • Which Month - Event occurs on which of the month.
  • Specific Days - Event occurs on specific days.
Default Value:
None

What months will this event occur on?

Function:
Specifies in which months this event occurs.
Accepted Values:
  • Every Month - Event occurs each month.
  • Which Day of the Month - Event occurs in which day of the month.
  • Specific Month - Event occurs in the specified month.
Default Value:
None

Enable Scheduled Event

Function:
Specifies if the scheduled service trigger is active.
Accepted Values:
  • Selected - The scheduled service trigger is active.
  • Deselected - The scheduled service trigger is inactive.
Default Value:
Deselected